In this article, we quickly look into how to build Nested Angular component to use HTML control and bind it to model. In this article I'm going to use the same code that I have created for Component- AngularJS2
In this article, we will move label which was getting rendered at the bottom of student-form component to nested component.
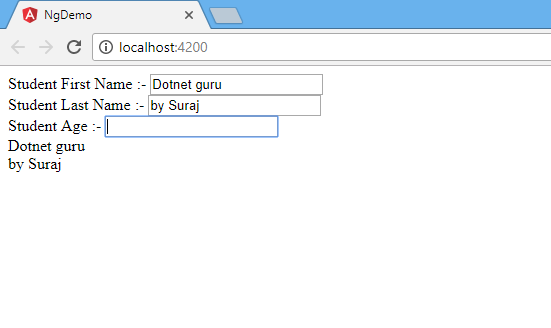
So, we have Student-Component for now. In which We have some input fields and Details section below.


In this article, we will move label which was getting rendered at the bottom of student-form component to nested component.
So, we have Student-Component for now. In which We have some input fields and Details section below.
Now we'll move details section in Child Component. for this we will add a new component in Component Directory.

It'll add two file in Component folder.
student-detail.component.html
student-detail.component.ts
Open the student-detail.component.ts file and write the following code.
import { Component, OnInit, Input, Output, EventEmitter } from '@angular/core';
@Component({
selector: 'app-student-detail',
templateUrl: './student-detail.component.html',
styles: []
})
export class StudentDetailComponent implements OnInit {
@Input() FirstName:String;
@Input() LastName:String;
@Input() Age:number;
constructor() { }
ngOnInit() {
}
}
In this component, we will be passing data from parent control to be rendered. To achieve this, we will also import Input from angular/core. We have defined selector and templateUrl at line 4 & 5. To map parent input with Student-Detail component, we have defined @input() and defined FirstName, LastName & Age at line 9, 10 & 11.
We can also have variable name and attribute name different. To have different attribute name, name needs to be defined inside bracket for example @Input('first-name')
@Input('first-name') FirstName:String;
@Input('last-name') LastName:String;
Similarly, we can also evolve methods from parent control using Output. To achieve this we will have to inject Output & EventEmitter dependency and then add a method to evoke parent method.
import { Component, OnInit, Input, Output, EventEmitter } from '@angular/core';
@Component({
selector: 'app-student-detail',
templateUrl: './student-detail.component.html',
styles: []
})
export class StudentDetailComponent implements OnInit {
@Input('first-name') FirstName:String;
@Input('last-name') LastName:String;
@Input() Age:number;
@Output('onButtonClick') buttonClick = new EventEmitter();
onCLick(){
this.buttonClick.emit();
}
constructor() { }
ngOnInit() {
}
}
Now open the student-detail.component.html file and replace the below code.
<section>
<br/>
<div>Student Details are ...</div>
<div>
First Name : {{FirstName}} <br/>
Last Name : {{LastName}} <br/>
Age : {{Age}}
</div>
<button (click)="onCLick()">Click Me</button>
<br/>
<ng-content></ng-content>
</section>
In the HTML template we just added, we are referring to variable defined in student-detail.component.ts at line 5,6 & 7. I have highlighted this variable name in the above HTML template. At line 7, we have mapped onClick method which will internally evoke parent control method mapped to it.
In the HTML template, we have also added ng-content tag . This tag will be rendering content we place between app-student-detail tag. We will discuss this more when we add app-student-detail tag in our main component student-form. Let's start injecting our new created component in student-form. Here is the updated template with app-student-detail tag.
<div>
Student First Name :- <input [(ngModel)] = "Student.FirstName" type="text"><br/>
Student Last Name :- <input [(ngModel)] = "Student.LastName" type="text"><br/>
Student Age :- <input [(ngModel)] = "Student.Age" type="text"><br/>
<app-student-detail first-name="{{Student.FirstName}}" last-name="{{Student.LastName}}"
Age="{{Student.Age}}" (onButtonClick)="onButtonClick()">
<div>This is inside nested control</div>
</app-student-detail>
</div>
At line 5 & 6, we have added tag app-student-detail attributes, FirstName LastName & Age with respective parent variable mapping. onButtonClick() method is mapped to child control. We have used the curly bracket for mapping variable but the same can also be achieved using square bracket as mentioned below:
<app-student-detail [first-name]="Student.FirstName" [last-name]="Student.LastName" [Age]="Student.Age" (onButtonClick)="onButtonClick()">
<div>This is inside nested control</div>
</app-student-detail>
Now we need to add onButtonClick method to student-component.component.ts.
import { Component, OnInit } from '@angular/core';
import { StudentModel } from '../Student.Model'
@Component({
selector: 'student-form',
templateUrl: './student-component.component.html',
styles: []
})
export class StudentComponentComponent implements OnInit {
constructor() { }
ngOnInit() {
}
Student : StudentModel = new StudentModel();
onButtonClick = function(){
alert('Hey, button was clicked in child component');
}
}
If you have noticed div tag between app-student-detail tag, the same will be passed to app-student-detail component and will be rendered inside ng-content tag which we have added inside student-detail component.
Now run the application using ng serve command in terminal. You should now see final output in your default browser. If you type inside textbox, the same should get displayed inside nested component.
You can now see final output in your default browser. If you type inside textbox, the same should get displayed inside nested component.
In this article, we created a nested component which takes data from parent component and then renders it. We did also look into the couple of ways we can map data with child control.

0 comments:
Post a Comment