Here in this tutorial, I am assuming that you have basic knowledge of Angular 2 or higher version. In this tutorial I am creating a simple demo with crud operation using Angular as frontend and Webapi as backend. In the previous tutorial I already created Api layer
Click here. So here I'll create step by step Frontend part that includes Angular Components and Services.
1- First Install NodeJs
https://nodejs.org/en/ , and Visual Studio Code for editor
https://code.visualstudio.com/
2- Open VisualStudio Code. Open Terminal window and Install CLI. To install the Angular CLI globally, run the following command on your console
npm install -g @angular/cli
3- Create a new project using below command.
E:\> cd E:\Projects\SOTI\AngularApp
E:\Projects\SOTI\AngularApp> ng new EmployeeApp
4- Open the project in Editor.
5- Add the Api Url in environment.ts file.
export const environment = {
  production: false,
  apiAddress: 'http://192.168.0.6:81/api'
};
6- Add the below folders in src/app
- Employee
- Models
- Services
7- Add a new class in Models folder named "employee.ts" and add the below Fields.
export class Employee {
    costructor() { }
    EmpId: number;
    FirstName: string;
    LastName: string;
}
8- Now comes to Services folder. Create a new service that interacts with your Api.
ng generate service EmployeeService
Add the below codes in your Service class.
import { Injectable } from '@angular/core';
import { Observable } from 'rxjs';
import { Http, Headers, Response } from '@angular/http';
import 'rxjs/add/operator/map';
import 'rxjs/add/operator/catch';
import { environment as env } from '../../environments/environment';
import{Employee} from '../Models/employee';

@Injectable({
  providedIn: 'root'
})
export class EmployeeServiceService {
headers: Headers;
  constructor(private http: Http) {
    this.headers = new Headers({ 'content-type': 'application/json' });
   }

   getAll(): Observable<Employee[]> {
    return this.http.get(env.apiAddress + '/Employee')
        .map((res: Response) => res.json())
        .catch((error: any) => Observable.throw(error.json().error || 'Server error'));
}
  get(id: number): Observable<Employee> {
      return this.http
          .get(`${env.apiAddress}/Employee/${id}`)
          .map((res: Response) => {return res.json();})
          .catch((error: any) => Observable.throw('Server error'));
  }
  add(employee: Employee): Observable<Response> {

      return this.http
          .post(`${env.apiAddress}/Employee`, JSON.stringify(employee), { headers: this.headers })
          .catch((error: any) => Observable.throw('Server error'));
  }
  update(employee: Employee): Observable<Response> {
      return this.http
          .put(`${env.apiAddress}/Employee/${employee.EmpId}`, JSON.stringify(employee), { headers: this.headers })
          .catch((error: any) => Observable.throw('Server error'));
  }
  delete(id: number): Observable<Response> {
      return this.http
          .delete(`${env.apiAddress}/Employee/${id}`)
          .catch((error: any) => Observable.throw('Server error'));
  }
}
If map operator not found then execute the below command in terminal.
npm install --save rxjs-compat@6
9- Now I will create component for our UI things. comes to src/app/Employee folder. I will add three component for Employee List, Create and Edit. Below is the terminal command.
ng g c Employee --flat --spec false
ng g c CreateEmployee --flat --spec false
ng g c EditEmployee --flat --spec false
the above command will add the class files, html files and style files for each component. See the below Screenshot.
10- Now comes to Employee Listing component. open the
employee.component.ts file and add the below code.
import { Component, OnInit } from '@angular/core';
import { Router, ActivatedRoute } from '@angular/router';
import { EmployeeServiceService } from '../Services/employee-service.service';

@Component({
  selector: 'app-employee',
  templateUrl: './employee.component.html',
  styleUrls: ['./employee.component.css']
})
export class EmployeeComponent implements OnInit {

  employees: any[];
  constructor(private empService: EmployeeServiceService,private router: Router) { }

  ngOnInit() {
    this.getAllEmployee();
  }

  getAllEmployee(){
    this.empService.getAll().subscribe((res) => {
      this.employees = res;
    });
  }
  deleteProduct(id: number){
    if(id != undefined && id > 0){
      if(confirm("Are you sure?")){
        this.empService.delete(id).subscribe((res: any) => {
          console.log(res);
          if (res !== undefined) {

            this.getAllEmployee();
            alert("Employee has been deleted successfully.")
          }
        });
      }
     }
    else{alert("Invalid Employee Id")}
   }
}
In the above code I have called the service for fetching and deleting Employee data.
Now add the below html code in
employee.component.html to render data.
<h2>Employee Listing</h2>
<a [routerLink]="['/create']" class="btn btn-info">Add new Employee</a>
<hr>
<table class="table table-bordered table-hover">
  <thead>
    <tr>
      <th>Employee ID</th>
      <th>First Name</th>
      <th>Last Name</th>
      <th>Actions</th>
    </tr>
  </thead>
  <tbody>
    <tr *ngFor="let item of employees">
      <!-- <td>{{i+1}}</td> -->
      <td>{{item.EmpId}}</td>
      <td>{{item.FirstName}}</td>
      <td>{{item.LastName}}</td>
      <td>
          <a [routerLink]="['/Edit', item.EmpId]" class="btn btn-info">Edit</a> |
          <button type="button" class="btn btn-danger" (click)="deleteProduct(item.EmpId)">Delete</button>
      </td>
    </tr>
  </tbody>
</table>
11- Now comes to Create Employee component. open the
create-employee.component.ts file and add the below code.
import { Component, OnInit } from '@angular/core';
import { Router, ActivatedRoute } from '@angular/router';
import { FormGroup, FormBuilder, Validators, NgForm } from '@angular/forms';
import { EmployeeServiceService } from '../Services/employee-service.service';
import {Employee} from '../Models/employee';

@Component({
  selector: 'app-create-employee',
  templateUrl: './create-employee.component.html',
  styleUrls: ['./create-employee.component.css']
})
export class CreateEmployeeComponent implements OnInit {

  employee: Employee;
  constructor(private empService: EmployeeServiceService,private router: Router, private route: ActivatedRoute) {
   this.employee = new Employee();
   }

  ngOnInit() {}

  CreateEmployee(form: any)
  {
    if (form.valid) {
    this.empService.add(this.employee).subscribe((res: any) => {
      console.log(res);
      if (res !== undefined) {
        alert("Employee has been added successfully.")
        this.router.navigate(['List']);
      }
    });
  }
  else{alert("Form is invalid.");}
 }
}
In the above code I have called the service for creating new employee data.
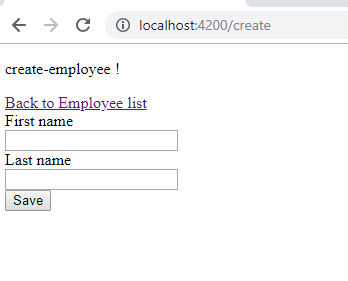
Now add the below html code in
create-employee.component.html to creating form.
<p>
  create-employee !
</p>
<a class="btn btn-default" href=".">Back to Employee list</a>

<form #form="ngForm" class="form-horizontal" (ngSubmit)="CreateEmployee(form)">
    <div class="form-group">
      <label class="col-sm-2">First name</label>
      <div class="col-sm-10">
        <input type="text" #FirstName="ngModel" name="FirstName" [(ngModel)]="employee.FirstName" required class="form-control">
        <div *ngIf="FirstName.errors && (form.submitted || FirstName.dirty)" class="text-danger">
            <span [hidden]="!FirstName.errors.required">Please Enter First Name</span>
        </div>

      </div>
    </div>
    <div class="form-group">
      <label class="col-sm-2">Last name</label>
      <div class="col-sm-10">
        <input type="text" #LastName="ngModel" name="LastName" [(ngModel)]="employee.LastName" required class="form-control">
        <div *ngIf="LastName.errors && (form.submitted || LastName.dirty)" class="text-danger">
            <span [hidden]="!LastName.errors.required">Please Enter Last Name</span>
        </div>
      </div>
    </div>
    <div class="form-group">
      <div class="col-sm-10 col-sm-offset-2">
        <button type="submit" class="btn btn-primary">Save</button>
      </div>
    </div>
  </form>
12- Now comes to Edit employee component. open the
edit-employee.component.ts file and add the below code.
import { Component, OnInit } from '@angular/core';
import { Router, ActivatedRoute } from '@angular/router';
import { FormGroup, FormBuilder, Validators, NgForm } from '@angular/forms';
import { EmployeeServiceService } from '../Services/employee-service.service';
import {Employee} from '../Models/employee';

@Component({
  selector: 'app-edit-employee',
  templateUrl: './edit-employee.component.html',
  styleUrls: ['./edit-employee.component.css']
})
export class EditEmployeeComponent implements OnInit {
  employee: Employee;
  id: number;
  constructor(private empService: EmployeeServiceService,private router: Router, private route: ActivatedRoute) {
    this.employee = new Employee();
    this.route.params.subscribe((params) => {
    this.id = params.id;
   });
  }

  ngOnInit() {
    this.FillEmployee();
  }

  FillEmployee()
  {
    this.empService.get(this.id).subscribe((res) => {
      console.log(res);
      this.employee = res;
    });
  }

  UpdateEmployee(form: any)
  {
    if (form.valid) {
      this.empService.update(this.employee).subscribe((res: any) => {
        console.log(res);
        if (res !== undefined) {
          alert("Employee has been updated successfully.")
          this.router.navigate(['List']);
        }
      });
    }
    else{alert("Form is invalid.");}
  }
}
In the above code I have called the service for updating the existing employee data.
Now add the below html code in
edit-employee.component.html for editing the data.
<p>
 Edit Employee
</p>
<a class="btn btn-default" href=".">Back to Employee list</a>

<form #form="ngForm" class="form-horizontal" (ngSubmit)="UpdateEmployee(form)">
    <div class="form-group">
      <label class="col-sm-2">First name</label>
      <div class="col-sm-10">
        <input type="text" #FirstName="ngModel" name="FirstName" [(ngModel)]="employee.FirstName" required class="form-control">
        <div *ngIf="FirstName.errors && (form.submitted || FirstName.dirty)" class="text-danger">
            <span [hidden]="!FirstName.errors.required">Please Enter First Name</span>
        </div>
      </div>
    </div>
    <div class="form-group">
      <label class="col-sm-2">Last name</label>
      <div class="col-sm-10">
        <input type="text" #LastName="ngModel" name="LastName" [(ngModel)]="employee.LastName" required class="form-control">
        <div *ngIf="LastName.errors && (form.submitted || LastName.dirty)" class="text-danger">
            <span [hidden]="!LastName.errors.required">Please Enter Last Name</span>
        </div>
      </div>
    </div>
    <div class="form-group">
      <div class="col-sm-10 col-sm-offset-2">
        <button type="submit" class="btn btn-primary">Update</button>
      </div>
    </div>
  </form>
13- Add the Routing module in src/app folder. use the below command.
ng generate module app-routing --flat --module=app
Add the below codes in the app-routing.module.ts file.
import { NgModule } from '@angular/core';
import { Routes, RouterModule } from '@angular/router';
import{EmployeeComponent} from '../app/Employee/employee.component';
import {CreateEmployeeComponent} from '../app/Employee/create-employee.component';
import {EditEmployeeComponent} from '../app/Employee/edit-employee.component';

const routes: Routes = [
  { path: '', component: EmployeeComponent },
  { path: 'List', component: EmployeeComponent },
  { path: 'Edit/:id', component: EditEmployeeComponent },
  { path: 'create', component: CreateEmployeeComponent  }
];

@NgModule({
  imports: [RouterModule.forRoot(routes)],
    exports: [RouterModule],
})
export class AppRoutingModule { }
14- Now run your application using ng serve command.
15-