Here in this tutorial, I am assuming that you have basic knowledge of Angular 2 or higher version. In this tutorial I am creating a simple demo with crud operation using Angular as frontend and Webapi as backend. In the previous tutorial I already created Api layer Click here. So here I'll create step by step Frontend part that includes Angular Components and Services.
 1- First Install NodeJs https://nodejs.org/en/ , and Visual Studio Code for editor https://code.visualstudio.com/
2- Open VisualStudio Code. Open Terminal window and Install CLI. To install the Angular CLI globally, run the following command on your console npm install -g @angular/cli
3- Create a new project using below command.

E:\> cd E:\Projects\SOTI\AngularApp
E:\Projects\SOTI\AngularApp> ng new EmployeeApp
4- Open the project in Editor.

5- Add the Api Url in environment.ts file.

8- Now comes to Services folder. Create a new service that interacts with your Api.
ng generate service EmployeeService
Add the below codes in your Service class.
If map operator not found then execute the below command in terminal.
npm install --save rxjs-compat@6
9- Now I will create component for our UI things. comes to src/app/Employee folder. I will add three component for Employee List, Create and Edit. Below is the terminal command.
ng g c Employee --flat --spec false
ng g c CreateEmployee --flat --spec false
ng g c EditEmployee --flat --spec false
the above command will add the class files, html files and style files for each component. See the below Screenshot.

10- Now comes to Employee Listing component. open the employee.component.ts file and add the below code.
In the above code I have called the service for fetching and deleting Employee data.
Now add the below html code in employee.component.html to render data.
11- Now comes to Create Employee component. open the create-employee.component.ts file and add the below code.
In the above code I have called the service for creating new employee data.
Now add the below html code in create-employee.component.html to creating form.
12- Now comes to Edit employee component. open the edit-employee.component.ts file and add the below code.
In the above code I have called the service for updating the existing employee data.
Now add the below html code in edit-employee.component.html for editing the data.
13- Add the Routing module in src/app folder. use the below command.
ng generate module app-routing --flat --module=app

Add the below codes in the app-routing.module.ts file.
14- Now run your application using ng serve command.


2- Open VisualStudio Code. Open Terminal window and Install CLI. To install the Angular CLI globally, run the following command on your console npm install -g @angular/cli
3- Create a new project using below command.

E:\Projects\SOTI\AngularApp> ng new EmployeeApp
4- Open the project in Editor.

5- Add the Api Url in environment.ts file.
export const environment = {
  production: false,
  apiAddress: 'http://192.168.0.6:81/api'
};

6- Add the below folders in src/app
- Employee
- Models
- Services
export class Employee {
    costructor() { }
    EmpId: number;
    FirstName: string;
    LastName: string;
}
8- Now comes to Services folder. Create a new service that interacts with your Api.
ng generate service EmployeeService
Add the below codes in your Service class.
import { Injectable } from '@angular/core';
import { Observable } from 'rxjs';
import { Http, Headers, Response } from '@angular/http';
import 'rxjs/add/operator/map';
import 'rxjs/add/operator/catch';
import { environment as env } from '../../environments/environment';
import{Employee} from '../Models/employee';

@Injectable({
  providedIn: 'root'
})
export class EmployeeServiceService {
headers: Headers;
  constructor(private http: Http) {
    this.headers = new Headers({ 'content-type': 'application/json' });
   }

   getAll(): Observable<Employee[]> {
    return this.http.get(env.apiAddress + '/Employee')
        .map((res: Response) => res.json())
        .catch((error: any) => Observable.throw(error.json().error || 'Server error'));
}
  get(id: number): Observable<Employee> {
      return this.http
          .get(`${env.apiAddress}/Employee/${id}`)
          .map((res: Response) => {return res.json();})
          .catch((error: any) => Observable.throw('Server error'));
  }
  add(employee: Employee): Observable<Response> {

      return this.http
          .post(`${env.apiAddress}/Employee`, JSON.stringify(employee), { headers: this.headers })
          .catch((error: any) => Observable.throw('Server error'));
  }
  update(employee: Employee): Observable<Response> {
      return this.http
          .put(`${env.apiAddress}/Employee/${employee.EmpId}`, JSON.stringify(employee), { headers: this.headers })
          .catch((error: any) => Observable.throw('Server error'));
  }
  delete(id: number): Observable<Response> {
      return this.http
          .delete(`${env.apiAddress}/Employee/${id}`)
          .catch((error: any) => Observable.throw('Server error'));
  }
}
If map operator not found then execute the below command in terminal.
npm install --save rxjs-compat@6
9- Now I will create component for our UI things. comes to src/app/Employee folder. I will add three component for Employee List, Create and Edit. Below is the terminal command.
ng g c Employee --flat --spec false
ng g c CreateEmployee --flat --spec false
ng g c EditEmployee --flat --spec false
the above command will add the class files, html files and style files for each component. See the below Screenshot.

10- Now comes to Employee Listing component. open the employee.component.ts file and add the below code.
import { Component, OnInit } from '@angular/core';
import { Router, ActivatedRoute } from '@angular/router';
import { EmployeeServiceService } from '../Services/employee-service.service';

@Component({
  selector: 'app-employee',
  templateUrl: './employee.component.html',
  styleUrls: ['./employee.component.css']
})
export class EmployeeComponent implements OnInit {

  employees: any[];
  constructor(private empService: EmployeeServiceService,private router: Router) { }

  ngOnInit() {
    this.getAllEmployee();
  }

  getAllEmployee(){
    this.empService.getAll().subscribe((res) => {
      this.employees = res;
    });
  }
  deleteProduct(id: number){
    if(id != undefined && id > 0){
      if(confirm("Are you sure?")){
        this.empService.delete(id).subscribe((res: any) => {
          console.log(res);
          if (res !== undefined) {

            this.getAllEmployee();
            alert("Employee has been deleted successfully.")
          }
        });
      }
     }
    else{alert("Invalid Employee Id")}
   }
}
In the above code I have called the service for fetching and deleting Employee data.
Now add the below html code in employee.component.html to render data.
<h2>Employee Listing</h2>
<a [routerLink]="['/create']" class="btn btn-info">Add new Employee</a>
<hr>
<table class="table table-bordered table-hover">
  <thead>
    <tr>
      <th>Employee ID</th>
      <th>First Name</th>
      <th>Last Name</th>
      <th>Actions</th>
    </tr>
  </thead>
  <tbody>
    <tr *ngFor="let item of employees">
      <!-- <td>{{i+1}}</td> -->
      <td>{{item.EmpId}}</td>
      <td>{{item.FirstName}}</td>
      <td>{{item.LastName}}</td>
      <td>
          <a [routerLink]="['/Edit', item.EmpId]" class="btn btn-info">Edit</a> |
          <button type="button" class="btn btn-danger" (click)="deleteProduct(item.EmpId)">Delete</button>
      </td>
    </tr>
  </tbody>
</table>
11- Now comes to Create Employee component. open the create-employee.component.ts file and add the below code.
import { Component, OnInit } from '@angular/core';
import { Router, ActivatedRoute } from '@angular/router';
import { FormGroup, FormBuilder, Validators, NgForm } from '@angular/forms';
import { EmployeeServiceService } from '../Services/employee-service.service';
import {Employee} from '../Models/employee';

@Component({
  selector: 'app-create-employee',
  templateUrl: './create-employee.component.html',
  styleUrls: ['./create-employee.component.css']
})
export class CreateEmployeeComponent implements OnInit {

  employee: Employee;
  constructor(private empService: EmployeeServiceService,private router: Router, private route: ActivatedRoute) {
   this.employee = new Employee();
   }

  ngOnInit() {}

  CreateEmployee(form: any)
  {
    if (form.valid) {
    this.empService.add(this.employee).subscribe((res: any) => {
      console.log(res);
      if (res !== undefined) {
        alert("Employee has been added successfully.")
        this.router.navigate(['List']);
      }
    });
  }
  else{alert("Form is invalid.");}
 }
}
In the above code I have called the service for creating new employee data.
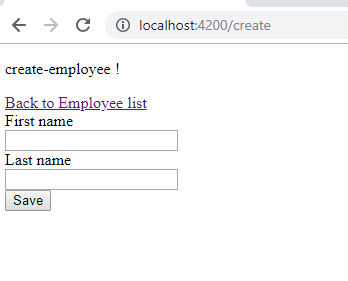
Now add the below html code in create-employee.component.html to creating form.
<p>
  create-employee !
</p>
<a class="btn btn-default" href=".">Back to Employee list</a>

<form #form="ngForm" class="form-horizontal" (ngSubmit)="CreateEmployee(form)">
    <div class="form-group">
      <label class="col-sm-2">First name</label>
      <div class="col-sm-10">
        <input type="text" #FirstName="ngModel" name="FirstName" [(ngModel)]="employee.FirstName" required class="form-control">
        <div *ngIf="FirstName.errors && (form.submitted || FirstName.dirty)" class="text-danger">
            <span [hidden]="!FirstName.errors.required">Please Enter First Name</span>
        </div>

      </div>
    </div>
    <div class="form-group">
      <label class="col-sm-2">Last name</label>
      <div class="col-sm-10">
        <input type="text" #LastName="ngModel" name="LastName" [(ngModel)]="employee.LastName" required class="form-control">
        <div *ngIf="LastName.errors && (form.submitted || LastName.dirty)" class="text-danger">
            <span [hidden]="!LastName.errors.required">Please Enter Last Name</span>
        </div>
      </div>
    </div>
    <div class="form-group">
      <div class="col-sm-10 col-sm-offset-2">
        <button type="submit" class="btn btn-primary">Save</button>
      </div>
    </div>
  </form>
12- Now comes to Edit employee component. open the edit-employee.component.ts file and add the below code.
import { Component, OnInit } from '@angular/core';
import { Router, ActivatedRoute } from '@angular/router';
import { FormGroup, FormBuilder, Validators, NgForm } from '@angular/forms';
import { EmployeeServiceService } from '../Services/employee-service.service';
import {Employee} from '../Models/employee';

@Component({
  selector: 'app-edit-employee',
  templateUrl: './edit-employee.component.html',
  styleUrls: ['./edit-employee.component.css']
})
export class EditEmployeeComponent implements OnInit {
  employee: Employee;
  id: number;
  constructor(private empService: EmployeeServiceService,private router: Router, private route: ActivatedRoute) {
    this.employee = new Employee();
    this.route.params.subscribe((params) => {
    this.id = params.id;
   });
  }

  ngOnInit() {
    this.FillEmployee();
  }

  FillEmployee()
  {
    this.empService.get(this.id).subscribe((res) => {
      console.log(res);
      this.employee = res;
    });
  }

  UpdateEmployee(form: any)
  {
    if (form.valid) {
      this.empService.update(this.employee).subscribe((res: any) => {
        console.log(res);
        if (res !== undefined) {
          alert("Employee has been updated successfully.")
          this.router.navigate(['List']);
        }
      });
    }
    else{alert("Form is invalid.");}
  }
}
In the above code I have called the service for updating the existing employee data.
Now add the below html code in edit-employee.component.html for editing the data.
<p>
 Edit Employee
</p>
<a class="btn btn-default" href=".">Back to Employee list</a>

<form #form="ngForm" class="form-horizontal" (ngSubmit)="UpdateEmployee(form)">
    <div class="form-group">
      <label class="col-sm-2">First name</label>
      <div class="col-sm-10">
        <input type="text" #FirstName="ngModel" name="FirstName" [(ngModel)]="employee.FirstName" required class="form-control">
        <div *ngIf="FirstName.errors && (form.submitted || FirstName.dirty)" class="text-danger">
            <span [hidden]="!FirstName.errors.required">Please Enter First Name</span>
        </div>
      </div>
    </div>
    <div class="form-group">
      <label class="col-sm-2">Last name</label>
      <div class="col-sm-10">
        <input type="text" #LastName="ngModel" name="LastName" [(ngModel)]="employee.LastName" required class="form-control">
        <div *ngIf="LastName.errors && (form.submitted || LastName.dirty)" class="text-danger">
            <span [hidden]="!LastName.errors.required">Please Enter Last Name</span>
        </div>
      </div>
    </div>
    <div class="form-group">
      <div class="col-sm-10 col-sm-offset-2">
        <button type="submit" class="btn btn-primary">Update</button>
      </div>
    </div>
  </form>
13- Add the Routing module in src/app folder. use the below command.
ng generate module app-routing --flat --module=app

Add the below codes in the app-routing.module.ts file.
import { NgModule } from '@angular/core';
import { Routes, RouterModule } from '@angular/router';
import{EmployeeComponent} from '../app/Employee/employee.component';
import {CreateEmployeeComponent} from '../app/Employee/create-employee.component';
import {EditEmployeeComponent} from '../app/Employee/edit-employee.component';

const routes: Routes = [
  { path: '', component: EmployeeComponent },
  { path: 'List', component: EmployeeComponent },
  { path: 'Edit/:id', component: EditEmployeeComponent },
  { path: 'create', component: CreateEmployeeComponent  }
];

@NgModule({
  imports: [RouterModule.forRoot(routes)],
    exports: [RouterModule],
})
export class AppRoutingModule { }
14- Now run your application using ng serve command.

15-


Download the complete angular project. Click here

0 comments:
Post a Comment