This tutorials only for beginner level developers. In this I will let you know a simple Asp.net Core WebApi Project interacting with OCELOT opensource API Gateway.
Microservices, also known as Microservices Architecture, is basically an SDLC approach in which large applications are built as a collection of small functional modules. It is one of the most widely adopted architectural concepts within software development. In addition to helping in easy maintenance, this architecture also makes development faster.
See the above picture of a Simple Microservice Architecture.
Now We will learn Microservice By creating a simple application.
Create a Asp.net core WebApi Project in Visual studio 2019.
Delete pre defined WeatherForecast Controller and model and Create UserController and User Model as per below screenshot.
Code are given below.
namespace UserService.Database.Entities
{
public class User
{
public int Id { get; set; }
public string Name { get; set; }
public string Address { get; set; }
public string Contact { get; set; }
}
}
We need to install Microsoft.EntityFrameworkCore, Microsoft.EntityFrameworkCore.SQLServer, Microsoft.EntityFrameworkCore.Tools. version should be as per DotnetCore version. here I am using 3.1 version.
using Microsoft.EntityFrameworkCore;
using UserService.Database.Entities;
namespace UserService.Database
{
public class DatabaseContext : DbContext
{
public DbSet<User> Users { get; set; }
protected override void OnConfiguring(DbContextOptionsBuilder optionsBuilder)
{
optionsBuilder.UseSqlServer(@"data source=SURAJKUMAR-PC/SKM;
initial catalog=EntityFrameworkCoreDB;persist security info=True;
user id=sa;password=1234;");
}
}
}
using Microsoft.AspNetCore.Http;
using Microsoft.AspNetCore.Mvc;
using System;
using System.Collections.Generic;
using System.Linq;
using UserService.Database;
using UserService.Database.Entities;
namespace UserService.Controllers
{
[Route("api/[controller]")]
[ApiController]
public class UserController : ControllerBase
{
DatabaseContext db;
public UserController()
{
db = new DatabaseContext();
}
// GET: api/<UserController>
[HttpGet]
public IEnumerable<User> Get()
{
return db.Users.ToList();
}
// GET api/<UserController>/5
[HttpGet("{id}")]
public User Get(int id)
{
return db.Users.Find(id);
}
// POST api/<UserController>
[HttpPost]
public IActionResult Post([FromBody] User user)
{
try
{
db.Users.Add(user);
db.SaveChanges();
return StatusCode(StatusCodes.Status201Created);
}
catch (Exception)
{
return StatusCode(StatusCodes.Status500InternalServerError);
}
}
}
}
Now Save everything and lets create database table. Open Package manager Console in Visual Studio and execute the below highlighted command for migration.
This will genrate migration script and update the things in Sql server. Now lets checkout our SQL server DB.
See, Users table has been created. Now lets add one record in table for API testing.
Id Name Address Contact
1 suraj delhi 987643222
Run the application and execute below API url. You will see the response.
Our API is ready now.
Creating OCELOT API Gateway.
Now Add one more project (ASP.NET Core WebApp blank project) inside same solution named APIGateway.
- Add Ocelot Package from Nuget pckg manager.
- Add ocelot.json file.
Add Routes data inside ocelot.json file as per below code.
{
"Routes": [
{
"DownstreamPathTemplate": "/api/user",
"DownstreamScheme": "http",
"DownstreamHostAndPorts": [
{
"Host": "localhost",
"Port": "30935"
}
],
"UpstreamHttpMethod": [ "GET" ],
"UpstreamPathTemplate": "/user"
},
{
"DownstreamPathTemplate": "/api/user/{id}",
"DownstreamScheme": "http",
"DownstreamHostAndPorts": [
{
"Host": "localhost",
"Port": "30935"
}
],
"UpstreamHttpMethod": [ "GET" ],
"UpstreamPathTemplate": "/user/{id}"
}
]
}
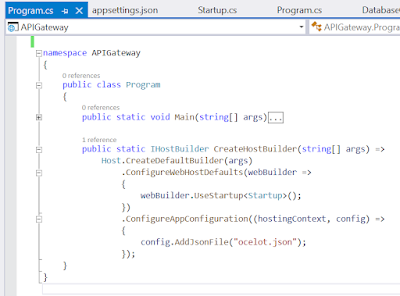
Add the above json file in Program.cs class as per below screenshot.
Add Ocelot service and middleware in StartUp class as pr below screenshot.
Now Run Both the application and see results.
Use the url as per below screenshot for testing.


