Building directives in Angular 2+ is not much different than building components. After all, components are just directives with a view attached. In fact, there are three kinds of directives in Angular: components, attribute directives and structural directives. https://dzone.com/
Types of Directives
Angular 2 categorizes directives into 3 parts:
Create Directive Folder inside src/app/ folder.
Add a custom directive inside Directive folder
cd Directive <Enter>
ng g d highlight --spec false <Enter>
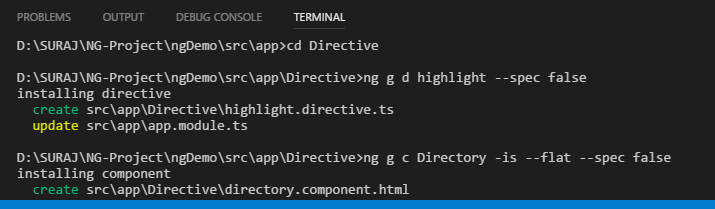
It'll add a highlight.directive.ts file.
Open the file and replace the following code.
HostListener: Decorator that declares a DOM event to listen for, and provides a handler method to run when that event occurs.
Types of Directives
Angular 2 categorizes directives into 3 parts:
- Directives with templates known as Components
- Directives that creates and destroys DOM elements known as Structural Directives
- Directives that manipulate DOM by changing behavior and appearance known as Attribute Directives
Create Directive Folder inside src/app/ folder.
Add a custom directive inside Directive folder
cd Directive <Enter>
ng g d highlight --spec false <Enter>
It'll add a highlight.directive.ts file.
Open the file and replace the following code.
import { Directive, HostListener, ElementRef } from '@angular/core';
@Directive({
selector: '[Highlight], .Highlight'
})
export class HighlightDirective {
constructor(private el: ElementRef) { }
@HostListener('mouseover') onmouseover() {
this.el.nativeElement.style.backgroundColor = 'yellow';
}
@HostListener('mouseleave') onmouseleave() {
this.el.nativeElement.style.backgroundColor = null;
}
}
HostListener: Decorator that declares a DOM event to listen for, and provides a handler method to run when that event occurs.
Now add a Component, in which you will use the above Highlight directive.
ng g c Directory -is --flat --spec false <Enter>
[You can also see the command in the above image]
It'll add two file
directory.component.ts
directory.component.html
In directory.component.ts file you dont need to write anything. open the directory.component.html file. and add the below code.
Now you are done with the code for Custom Directive.
To run the page, bootstrap the DirectoryComponent in app.Module.ts file.
Add the selector of directive component in index.html file.
ng g c Directory -is --flat --spec false <Enter>
[You can also see the command in the above image]
It'll add two file
directory.component.ts
directory.component.html
In directory.component.ts file you dont need to write anything. open the directory.component.html file. and add the below code.
<h2 class="Highlight">Custom Directive- Class Based</h2>
<h2 Highlight>Custom Directive- Attribute Based</h2>
Now you are done with the code for Custom Directive.
To run the page, bootstrap the DirectoryComponent in app.Module.ts file.
import { BrowserModule } from '@angular/platform-browser';
import { NgModule } from '@angular/core';
import { AppComponent } from './app.component';
import { HighlightDirective } from './Directive/highlight.directive';
import { DirectoryComponent } from './Directive/directory.component';
@NgModule({
declarations: [
AppComponent,
HighlightDirective,
DirectoryComponent
],
imports: [
BrowserModule
],
providers: [],
bootstrap: [DirectoryComponent]
})
export class AppModule { }
Add the selector of directive component in index.html file.
<!doctype html>
<html lang="en">
<head>
<meta charset="utf-8">
<title>NgDemo</title>
<base href="/">
<meta name="viewport" content="width=device-width, initial-scale=1">
<link rel="icon" type="image/x-icon" href="favicon.ico">
</head>
<body>
<!-- <app-root></app-root> -->
<app-directory></app-directory>
</body>
</html>
ng serve <Enter>
See the Output. when you hover the mouse on h2 element it'll highlight in yellow colour.

Thanks and Regards
Suraj K. Mad.

0 comments:
Post a Comment