Thursday, 7 November 2024

Disadvantages of .NET Core

 Here are some disadvantages of .NET Core:

  • Limited libraries and tools

.NET Core doesn't have as many libraries and tools as .NET Framework. 

  • Less community support

.NET Core has a smaller community of developers than .NET Framework, so it may be harder to find answers to problems. 

  • No support for web forms

.NET Core doesn't support web forms, so if your applications rely on them, you'll need to use .NET Framework or look for alternatives. 

  • Some technologies are not available

Some .NET Framework technologies are not available in .NET Core, and some may never be available. 

  • Learning curve

.NET is extensive and has a large set of tools and technologies, which can make it challenging for new developers to learn. 

  • Legacy

Many CMS and eCommerce solutions are still based on a non-Core version of .NET. 

Continue Reading →

Disadvantages of MicroServices

 While microservices offer several advantages such as scalability, flexibility, and resilience, they also come with a set of challenges and disadvantages:

1. Increased Complexity

  • System Complexity: Microservices break a monolithic application into many smaller services, which can significantly increase the complexity of managing multiple services, especially as the number of services grows. You need to consider service discovery, load balancing, distributed tracing, and more.
  • Distributed System Issues: Communication between services introduces challenges like network latency, partial failures, and data consistency issues.

2. Data Management and Consistency

  • Distributed Data Management: Each microservice typically has its own database, which can lead to data duplication and consistency issues, especially when trying to maintain ACID (Atomicity, Consistency, Isolation, Durability) properties across multiple databases.
  • Eventual Consistency: Microservices often rely on eventual consistency models, which can complicate transactions and data synchronization between services.

3. Increased Overhead

  • Resource Overhead: Each microservice often runs in its own container or VM, requiring more resources for deployment and operation than a monolithic application. This can lead to higher infrastructure costs.
  • Management Overhead: Microservices require more tools and infrastructure for deployment, monitoring, logging, security, and scaling. This often translates to increased overhead in managing these services.

4. Communication Complexity

  • Inter-Service Communication: Microservices typically communicate over HTTP, gRPC, or messaging queues, which introduces latency and potential failure points in communication between services. Handling retries, timeouts, and backoff strategies becomes necessary.
  • Network Dependency: Since services are distributed, they rely on networks for communication, which can be unreliable or slow, adding additional points of failure.

5. Deployment Challenges

  • Deployment and Versioning: Managing deployment pipelines for multiple services can be more complicated than for a single monolithic application. Coordinating versions of services, ensuring backward compatibility, and managing dependencies between services can be complex.
  • Service Coordination: When deploying updates, you must ensure that services are updated in the correct order and that dependent services are compatible with new versions.

6. Testing Complexity

  • End-to-End Testing: Testing microservices can be more complex than testing monolithic applications because of the number of services involved and the interactions between them. Integration testing is harder, and mocking all the necessary services can be time-consuming.
  • Mocking Dependencies: Since microservices rely on each other, you must ensure that all dependencies are correctly mocked or tested, which can be difficult in distributed systems.

7. Security Considerations

  • Distributed Security: Microservices introduce multiple entry points for security breaches. Each service needs to be individually secured, requiring more detailed and granular security policies.
  • Inter-Service Authentication: Properly managing authentication and authorization between services can be more challenging than in a monolithic system.

8. Skill and Team Structure Requirements

  • Skillset: Microservices often require a more specialized skill set, including expertise in distributed systems, containerization (e.g., Docker, Kubernetes), continuous integration/continuous deployment (CI/CD), and service orchestration.
  • Organizational Challenges: Teams need to be organized around individual services (or domains), which can require a shift in how teams work and communicate, and may not be practical for all organizations.

9. Latency

  • Network Latency: Communication between services, especially over the network, can introduce latency that would not be present in a monolithic architecture where components are part of the same codebase. This latency can be amplified when services are hosted across different locations or cloud providers.

10. Difficulty in Tracing and Debugging

  • Distributed Tracing: In a microservices architecture, debugging issues that span multiple services can be more difficult. Identifying the root cause of an issue requires effective monitoring, logging, and tracing across multiple services, which can be harder to manage than in a monolithic system.
  • Debugging Complexity: Since the system is composed of multiple loosely coupled services, tracking down errors that occur due to service interactions or network failures can be time-consuming and error-prone.

11. Monolithic Legacy Systems Integration

  • Integration with Legacy Systems: If a company has existing monolithic systems, integrating microservices into the current architecture can be challenging and costly. You may need to carefully design the boundaries of microservices and how they interact with the legacy system.

Despite these disadvantages, microservices can still be a powerful architecture for certain use cases, especially for large-scale, distributed applications where flexibility, scalability, and fault tolerance are essential. However, it's important to weigh these challenges against the benefits before adopting microservices.

Continue Reading →

Implement Retry Logic in C#

 Often, we have transient problems in our application, such as a network failure, system rebooting, or anything else that throws an exception. In this article, we are going to learn how to implement retry logic in C# to help us handle these problems.

Let’s start.

Simulate a Failure in Our Application

Before we create the retry logic in C#, we need a method that can create a transient problem. That said, let’s create a very basic logic to simulate the failure:

public static void FirstSimulationMethod()
{
    const int forbiddenNumber = 3;
    Console.Write("Write a number: ");
    var number = int.Parse(Console.ReadLine() ?? "0");
    if (number == forbiddenNumber)
        throw new ArgumentException($"The generated number must be different from
{forbiddenNumber}");
    Console.Write("Not Equal");
}

First, this method asks for a number. After parsing this number into an integer, it compares this number to a forbidden number we previously set.

If the input number is equal to the forbidden number, this method is going to throw an exception with a message, otherwise, it prints the “Not Equal” message in the console.

This exception simulates a transient problem that may occur by a brief network failure or something like this.

Creating the Second Method

Let’s inspect the second method:

public static int SecondSimulationMethod()
{
    const int forbiddenNumber = 3;
    Console.Write("Write a number: ");
    var number = int.Parse(Console.ReadLine() ?? "0");
    if (number == forbiddenNumber)
        throw new ArgumentException($"The generated number must be different from
{forbiddenNumber}");
    Console.Write("Not Equal");
    return number;
}

Note that this method is very similar to the FirstSimulationMethod, however, in the end, it returns the input value. This method is important to show how to implement retry logic using Action or Func delegates.

Implementing the Retry Logic in C#

Once we have the methods to simulate the transient problems, we can focus on writing the retry logic in C#. Let’s create an Executor static class with an Execute method:

public static class Executor
{
    public static void Execute(Action action, int numberOfRetries)
    {
        var tries = 0;
        while (tries <= numberOfRetries)
        {
            try
            {
                action();
                return;
            }
            catch
            {
                tries++;
            }
        }
        throw new Exception($"Error after {tries} tries");
    }
}

The Execute method is responsible to execute the logic several times if there’s any problem. It receives an Action as a first parameter and the number of times we want to retry (numberOfRetries) as a second parameter.

Then, we need to loop and execute the method until the tries variable value is lower or equal to the numberOfRetries variable value. If the Action executes successfully, the retry logic finishes its execution. However, in case of exception, it increments the tries variable and retries to execute the Action.

When the tries value is greater or equal than the numberOfRetries, it finishes the execution and throws an exception with some message.

Retry Logic in C# With the Func Delegate

Now, let’s create a new overload of the Execute method:

public static TResult? Execute<TResult>(Func<TResult> func, int numberOfRetries)
{
    var tries = 0;
   
    while (tries <= numberOfRetries)
    {
        try
        {
            return func();
        }
        catch
        {
            tries++;
        }
    }
    throw new Exception($"Error after {tries} tries");
}

Note that the main difference is that this time this is a generic method with a return type.

Once it has a return type, instead of receiving an Action as a parameter, this method receives a Func, and then, we return the result of this Func.

With both previous methods, we can use this retry logic in C# for both, Action and Func delegates.

Using the Executor Class

Once we have defined the Executor class and its methods, it is time to execute the FirstSimulationMethod and the SecondSimulationMethod methods.

Let’s check it:

Executor.Execute(FirstSimulationMethod, 3);

We call the Execute method under the Executor class passing the method we want to execute, and the maximum number of retries as parameters.

Now, let’s use the overload method:

var result = Executor.Execute(SecondSimulationMethod, 3);

This time, we pass a Func as the first parameter. That said, we need to declare a result variable to receive the return from this Func.

It is good to mention that when we send 3 as the number of retries, this method is going to execute 4 times. The first execution and three retries. 

We can Implement Retry logic with Polly https://www.pollydocs.org

Continue Reading →

Dependency Injection in Dotnet Core

 Dependency Injection (DI) in .NET Core is a fundamental design pattern that allows objects or services to be passed (injected) into a class rather than the class creating those dependencies itself. This promotes loose coupling and enhances testability and maintainability. .NET Core has built-in support for Dependency Injection via the Microsoft.Extensions.DependencyInjection library.

Key Concepts of Dependency Injection

  1. Service: A service is any class or object that provides some functionality to the application (e.g., database access, logging, or business logic).

  2. Dependency Injection Container: A DI container is responsible for managing the lifecycle of objects and their dependencies. It provides the necessary services and manages how objects are instantiated and injected.

  3. Injection Types:

    • Constructor Injection: Dependencies are provided via the constructor.
    • Property Injection: Dependencies are provided via properties (less common in .NET Core).
    • Method Injection: Dependencies are passed through method parameters.
  4. Lifetime of Services:

    • Transient: A new instance of the service is created each time it is requested.
    • Scoped: A single instance of the service is created per HTTP request, meaning it is shared within the scope of a request.
    • Singleton: A single instance of the service is created and shared throughout the application's lifetime.

How Dependency Injection Works in .NET Core

Step 1: Define Services/Interfaces

Create the interfaces and classes that define the services you want to inject.

public interface IWeatherService
{
    string GetWeather();
}

public class WeatherService : IWeatherService
{
    public string GetWeather()
    {
        return "Sunny";
    }
}

Step 2: Register Services with the DI Container

In .NET Core, services are registered in the ConfigureServices method of Startup.cs or Program.cs. This method adds the services to the DI container, specifying their lifetime. Learn here also

public class Startup
{
    public void ConfigureServices(IServiceCollection services)
    {
        // Register services with different lifetimes
        services.AddTransient<IWeatherService, WeatherService>(); // Transient
        // You can also use services.AddScoped<IWeatherService, WeatherService>();
        // Or services.AddSingleton<IWeatherService, WeatherService>();
    }

    public void Configure(IApplicationBuilder app, IHostingEnvironment env)
    {
        // Normal middleware pipeline setup
    }
}
  • AddTransient<TService, TImplementation>: Registers a service with a transient lifetime, meaning a new instance is created each time the service is requested.
  • AddScoped<TService, TImplementation>: Registers a service with a scoped lifetime, meaning the service is created once per HTTP request.
  • AddSingleton<TService, TImplementation>: Registers a service with a singleton lifetime, meaning a single instance is used throughout the application's lifetime.

Step 3: Inject Dependencies into Controllers or Services

In ASP.NET Core, dependencies are injected via constructor injection. The framework automatically resolves dependencies by looking at the constructor parameters and providing the appropriate instances from the DI container.

public class WeatherController : ControllerBase
{
    private readonly IWeatherService _weatherService;

    // Constructor Injection
    public WeatherController(IWeatherService weatherService)
    {
        _weatherService = weatherService;
    }

    public IActionResult GetWeather()
    {
        var weather = _weatherService.GetWeather();
        return Ok(weather);
    }
}

In this example, the IWeatherService dependency is injected into the WeatherController. ASP.NET Core automatically provides an instance of WeatherService because it was registered in the DI container.

Step 4: Using DI in Other Classes

You can inject services into any class that the DI container manages, not just controllers. For instance, you might inject a service into a background task or a custom service class.

public class MyService
{
    private readonly IWeatherService _weatherService;

    public MyService(IWeatherService weatherService)
    {
        _weatherService = weatherService;
    }

    public void PerformTask()
    {
        var weather = _weatherService.GetWeather();
        // Do something with the weather data
    }
}

Step 5: Resolving Dependencies at Runtime

When you request a service via DI, you can resolve it in two ways:

  1. Constructor Injection: As shown in the examples above, the DI container will automatically provide dependencies when the class is instantiated.
  2. Manually Resolving a Service: You can manually resolve a service from the DI container using the IServiceProvider interface. This is common in scenarios like background services or factory patterns.
public class MyService
{
    private readonly IServiceProvider _serviceProvider;

    public MyService(IServiceProvider serviceProvider)
    {
        _serviceProvider = serviceProvider;
    }

    public void ExecuteTask()
    {
        var weatherService = _serviceProvider.GetRequiredService<IWeatherService>();
        var weather = weatherService.GetWeather();
    }
}

Dependency Injection is handled by the built-in IoC container, which resolves services based on their lifetime and dependencies. This is typically done via constructor injection, where the necessary services are injected automatically by the framework. 

Benefits of Dependency Injection

  • Loose Coupling: Classes don’t manage their own dependencies, making it easier to swap out services.
  • Testability: You can inject mock services for unit testing without needing to change the class.
  • Flexibility: You can configure different lifetimes (transient, scoped, singleton) to manage resource usage and object creation.
  • Separation of Concerns: Classes focus on their primary responsibility, delegating the management of dependencies to the DI container.

Common Issues and Best Practices

  • Circular Dependencies: Be cautious of circular dependencies (A depends on B, and B depends on A). These can cause problems and are generally considered poor design.
  • Overusing DI: Don't overuse DI in situations where it’s not necessary. Sometimes, having a clear, explicit dependency in your class constructor is fine without the need for DI.
  • Single Responsibility: Ensure that services have a single responsibility, and avoid placing too many responsibilities within a single service class. This helps in maintaining code that is easier to understand and test.

Conclusion

In .NET Core, Dependency Injection is a powerful pattern that promotes loose coupling, testability, and maintainability. The framework provides built-in DI support that allows you to register, resolve, and manage dependencies in a very straightforward way. By leveraging DI properly, you can write more modular, maintainable, and scalable applications.


Continue Reading →

Thursday, 24 October 2024

Unit Test Coding

What is Assert method?

Assert is a static class which contains some methods to help you make checks in your test code. The methods check your condition and if the condition fails, it’ll also make the test fail with a nice message to it. These methods are pretty straightforward so I will just mention a couple of them, without explaining them.

  1. Assert.AreEqual(object, object)
  2. Assert.IsTrue(bool), Assert.IsFalse(bool)
  3. Assert.IsNull(object), Assert.IsNotNull(object)
  4. Assert.ThrowsException(Action) — useful if you expect an excetion to be thrown

1: Unit Testing a Static Method of a Static Class using MOQ

Below function will take identity as a parameter and check if user is Manager.

  public static class ApplicationUtils
    {
        public static bool IsUserAManager(IIdentity identity)
        {
            if (identity == null)
                throw new NullReferenceException("identity");


            return identity.Name == "AdminUser";
        }
    }

And Your Test Class using Moq.

  using DemoClassLib;
  using Microsoft.VisualStudio.TestTools.UnitTesting;
  using System.Security.Principal;
 
  namespace DemoUnitTestProject
  {
      [TestClass]
      public class UnitTest1
      {
          [TestMethod]
          public void IsUserAManagerTestIsAdminReturnsFalse()
          {
// Arrange
              var mockedIdentity = new Moq.Mock<IIdentity>();
              mockedIdentity.Setup(x => x.Name).Returns("notanadmin");
 
// Act
              var result = ApplicationUtils.IsUserAManager(mockedIdentity.Object);
 
// Assert
              Assert.IsFalse(result);
          }
 
          [TestMethod]
          public void IsUserAManagerTestIsAdminReturnsTrue()
          {
// Arrange
              var mockedIdentity = new Moq.Mock<IIdentity>();
              mockedIdentity.Setup(x => x.Name).Returns("AdminUser");
 
// Act
              var result = ApplicationUtils.IsUserAManager(mockedIdentity.Object);
 
// Assert
              Assert.IsTrue(result);
          }
      }
  }

Explanation

Test Class and Methods: Each test method is annotated with the [TestMethod] attribute. The class is marked with [TestClass].
Arrange-Act-Assert Pattern:
        Arrange: Set up the necessary variables.
        Act: Call the method under test.
        Assert: Verify the result using assertions.
Multiple Test Cases: You can create multiple test methods to cover various scenarios and edge cases.


2:  Amazing Ways to Unit Test Code That Calls Static Method in C#

Static methods can often seem like an excellent way to achieve reusability.

Write them once and call them whenever you want. The problem, however, arises when you need to test the C# code that calls a static method. It’s not straightforward to mock the static method for testing purposes.

There are three ways to test the code that calls static methods:

  1. Create a wrapper class and use dependency injection
  2. Use a static Func property
  3. Use the Extract and override call
Follow link here for more...

3: Create a Unit test for below service function which is calling repository method.

  public interface IRepository
  {
      string GetData(int id);
  }

  public class MyService
  {
      private readonly IRepository _repository;

      public MyService(IRepository repository)
      {
          _repository = repository;
      }

      public string GetServiceData(int id)
      {
          return _repository.GetData(id);
      }
  }

Now, create a test method in test class:

  [TestMethod]
  public void GetServiceData_ReturnsExpectedData()
  {
      // Arrange
      var mockRepo = new Mock<IRepository>();
      mockRepo.Setup(repo => repo.GetData(1)).Returns("Test Data");

      var service = new MyService(mockRepo.Object);

      // Act
      var result = service.GetServiceData(1);

      // Assert
      Assert.AreEqual("Test Data", result);
  }

Definitions for the following examples:

  public interface IEmployee
  {
      EmploymentHistory EmploymentHistory { get; set; }
      string Name { get; set; }
      int Id { get; set; }
      bool IsEmployeeExist(string value);
      bool DoSomething(int number, string value);
      Task<bool> DoSomethingAsync();
      string DoSomethingStringy(string value);
      bool IsEmployeeExist(string value, out string outputValue);
      bool Submit(ref EmploymentHistory bar);
      int GetEmployeeCount();
      bool Add(int value);
  }

  public class EmploymentHistory
  {
      public virtual Employer Employer { get; set; }
      public virtual bool Submit() { return false; }
  }

  public class Employer
  {
      public virtual string Name { get; set; }
  }

You can setup the behavior of any of a mock's overridable methods using Setup, combined with e.g. Returns (so they return a value) or Throws (so they throw an exception):

  var mock = new Mock<IEmployee>();
  mock.Setup(emp => emp.IsEmployeeExist("suraj")).Returns(false);

  // out arguments
  var outString = "welcome";
  // IsEmployeeExist will return true, and the out argument will return "welcome",
// lazy evaluated
  mock.Setup(emp => emp.IsEmployeeExist("suraj", out outString)).Returns(true);

  // access invocation arguments when returning a value
  mock.Setup(x => x.DoSomethingStringy(It.IsAny<string>()))
.Returns((string s) => s.ToLower());
  // Multiple parameters overloads available

  // throwing when invoked with specific parameters
  mock.Setup(emp => emp.IsEmployeeExist("12ka4")).Throws<InvalidOperationException>();
  mock.Setup(emp => emp.IsEmployeeExist("")).Throws(new ArgumentException("command"));

  // lazy evaluating return value
  var count = 1;
  mock.Setup(emp => emp.GetEmployeeCount()).Returns(() => count);

  // async methods (see below for more about async):
  mock.Setup(emp => emp.DoSomethingAsync().Result).Returns(true);

  // ref arguments
  var instance = new EmploymentHistory();
  // Only matches if the ref argument to the invocation is the same instance
  mock.Setup(emp => emp.Submit(ref instance)).Returns(true);

It.IsAny<T> is checking that the parameter is of type T, it can be any instance of type T. It's basically saying, I don't care what you pass in here as long as it is type of T.

4: Write a Unit test for following EntityClass.

  public interface IEntityRepository
  {
      string GetName(int id);
  }
 
  public class EntityRepository:IEntityRepository
  {
      public string GetName(int id)
      {
          // Code to connect to DB and get name based on Id
          return "NameFromDb";
      }
  }
  public class EntityClass
  {
      private IEntityRepository _entityRepository;
      public EntityClass(IEntityRepository entityRepository)
      {
          this._entityRepository = entityRepository;
      }
      public string Name { get; set; }
      public string GetNameWithPrefix(int id)
      {
          string name = string.Empty;
          if (id > 0)
          {
              name = this._entityRepository.GetName(id);
          }
          return "Mr. " + name;
      }
  }

Unit test methods here.

Example of mock vs stub using Moq. I have used Verify but you can use VerifyAll as well.

  using Microsoft.VisualStudio.TestTools.UnitTesting;
  using Moq;
  ...
 
  [TestClass]
  public class UnitTest1
  {
      /// <summary>
      /// Test using Mock to Verify that GetNameWithPrefix method calls
      /// Repository GetName method once when Id is greater than Zero
      /// </summary>
      [TestMethod]
      public void GetNameWithPrefix_IdIsTwelve_GetNameCalledOnce()
      {
          // Arrange
          var mockEntityRepository = new Mock<IEntityRepository>();
          mockEntityRepository.Setup(m => m.GetName(It.IsAny<int>()));
 
          var entity = new EntityClass(mockEntityRepository.Object);
          // Act
          var name = entity.GetNameWithPrefix(12);
          // Assert
          mockEntityRepository.Verify(
              m => m.GetName(It.IsAny<int>()), Times.Once);
      }
 
      /// <summary>
      /// Test using Mock to Verify that GetNameWithPrefix method
      /// doesn't calls Repository GetName method when Id is Zero
      /// </summary>
      [TestMethod]
      public void GetNameWithPrefix_IdIsZero_GetNameNeverCalled()
      {
          // Arrange
          var mockEntityRepository = new Mock<IEntityRepository>();
          mockEntityRepository.Setup(m => m.GetName(It.IsAny<int>()));
          var entity = new EntityClass(mockEntityRepository.Object);
          // Act
          var name = entity.GetNameWithPrefix(0);
          // Assert
          mockEntityRepository.Verify(
              m => m.GetName(It.IsAny<int>()), Times.Never);
      }
 
      /// <summary>
      /// Test using Stub to Verify that GetNameWithPrefix method
      /// returns Name with a Prefix
      /// </summary>
      [TestMethod]
      public void GetNameWithPrefix_IdIsTwelve_ReturnsNameWithPrefix()
      {
          // Arrange
          var stubEntityRepository = new Mock<IEntityRepository>();
          stubEntityRepository.Setup(m => m.GetName(It.IsAny<int>()))
              .Returns("Stub");
          const string EXPECTED_NAME_WITH_PREFIX = "Mr. Stub";
          var entity = new EntityClass(stubEntityRepository.Object);
          // Act
          var name = entity.GetNameWithPrefix(12);
          // Assert
          Assert.AreEqual(EXPECTED_NAME_WITH_PREFIX, name);
      }
  }

xUnit, NUnit, and MSTest are the three primary testing frameworks in .NET.


Continue Reading →

Wednesday, 9 October 2024

Unsubscribe observable

How to Unsubscribe

Various ways to Unsubscribe

Use Async Pipe: Use Async pipe to subscribe to an observable, it automatically cleans up, when we destroy the component.

Use Unsubscribe(): Use Unsubscribe() method on the subscription. It will clean up all listeners and frees up the memory

To do that, first create a variable to store the subscription.

  obs: Subscription;

Assign the subscription to the obs variable

  this.obs = this.src.subscribe(value => {
    console.log("Received " + this.id);
  });

Call the unsubscribe() method in the ngOnDestroy method.

  ngOnDestroy() {
    this.obs.unsubscribe();
  }

When we destroy the component, the observable is unsubscribed and cleaned up.

Continue Reading →

Sunday, 6 October 2024

Clean Architecture

What is Clean Architecture?

Clean Architecture is a design pattern that separates an application into different layers based on their responsibility.  It’s a way of organizing your code into independent, testable, and reusable components. 

It isolates the business logic of the application from external details such as user interfaces, databases, and frameworks.

The primary objective of Clean Architecture is to create a structure that makes it easy to manage and maintain an application as it grows and changes over time. It also makes it easy to add new features, fix bugs, and make changes to existing functionality without affecting the rest of the application.

Implementing Clean Architecture in ASP .NET Core Web API

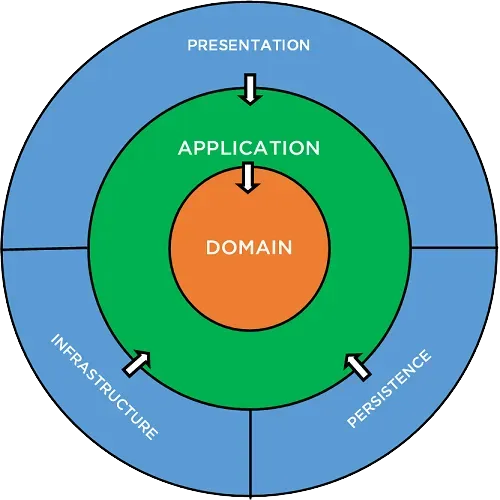
To apply Clean Architecture, we can divide the application into four primary layers:

Domain Layer – The domain layer represents the application’s core business rules and entities. This is the innermost layer and should not have any external dependencies. It contains domain entities, value objects, and domain services.

Application Layer – The application layer sits just outside the domain layer and acts as an intermediary between the domain layer and other layers. In other words, it contains the use cases of the application and we expose the core business rules of the domain layer through the application layer. This layer depends just on the domain layer.

Infrastructure Layer – We implement all the external services like databases, file storage, emails, etc. in the infrastructure layer. It contains the implementations of the interfaces defined in the domain layer.

Presentation Layer – The presentation layer handles the user interactions and fetches data to the user interface. It contains the user interface components (e.g., MVC, API Controllers, Blazor components).

With Clean Architecture, the Domain and Application layers are at the center of the design. This is known as the Core of the system.

The Domain layer contains enterprise logic and types and the Application layer contains business logic and types. The difference is that enterprise logic could be shared across many systems, whereas the business logic will typically only be used within this system.

Implementing the Project Structure:

Creating the Core Layer:

  1. Define Entities and Use Cases.
  2. Create a folder named “Core.”
  3. Within this folder, classes for Entities such as “User.cs” or “Product.cs” are created.
  4. Create interfaces or abstract classes for Use Cases like “IUserService.cs”.

Creating the Application Layer:

  1. Implement Use Cases.
  2. Create a folder named “Application.”
  3. Implement Use Cases as classes that inherit from the interfaces defined in the Core layer.
  4. For example: “UserService.cs”.

Creating the Infrastructure Layer:

  1. Implement Interface Adapters.
  2. Create a folder named “Infrastructure.”
  3. Implement concrete classes for the interfaces defined in the Core layer.
  4. For example: “UserRepository.cs” for “IUserRepository”.

Project Structure


Benefits of Clean Architecture:

Maintainability: Easier to modify and extend the system.

Flexibility: Adapts to changing requirements with minimal impact on other components.

Scalability: Better suited for large, complex systems.

Reference

https://code-maze.com/ , 

https://positiwise.com/

https://www.macrix.eu/ ,

https://medium.com/


Continue Reading →

Topics

ADFS (1) ADO .Net (1) Ajax (1) Angular (47) Angular Js (15) ASP .Net (14) Authentication (4) Azure (3) Breeze.js (1) C# (55) CD (1) CI (2) CloudComputing (2) Coding (10) CQRS (1) CSS (2) Design_Pattern (7) DevOps (4) DI (3) Dotnet (10) DotnetCore (20) Entity Framework (5) ExpressJS (4) Html (4) IIS (1) Javascript (17) Jquery (8) jwtToken (4) Lamda (3) Linq (10) microservice (4) Mongodb (1) MVC (46) NodeJS (8) React (10) SDLC (1) Sql Server (32) SSIS (3) SSO (1) TypeScript (3) UI (1) UnitTest (2) WCF (14) Web Api (16) Web Service (1) XMl (1)

Dotnet Guru Archives