Friday, 16 March 2018

Lazy Loading Modules

There are three main steps to setting up a lazy loaded child module:
  1. Create the child module.
  2. Create the child module’s routing module.
  3. Configure the routes.

Set up an app
If you don’t already have an app, you can follow the steps below to create one with the CLI. If you do already have an app, skip to Configure the routes. Enter the following command where customer-app is the name of your app:

ng new customer-app --routing

This creates an app called customer-app and the --routing flag generates a file called app-routing.module.ts, which is one of the files you need for setting up lazy loading for your feature module. Navigate into the project by issuing the command cd customer-app.

Create a child module with routing
Next, you’ll need a child module to route to. To make one, enter the following command at the terminal window prompt where customers is the name of the module:

ng generate module customers --routing

This creates a customers folder with two files inside; CustomersModule and CustomersRoutingModule.
CustomersModule will act as the gatekeeper for anything that concerns customers. CustomersRoutingModule will handle any customer-related routing. This keeps the app’s structure organized as the app grows and allows you to reuse this module while easily keeping its routing intact.

The CLI imports the CustomersRoutingModule into the CustomersModule by adding a JavaScript import statement at the top of the file and adding CustomersRoutingModule to the @NgModule imports array.

Add a component to the child module
In order to see the module being lazy loaded in the browser, create a component to render some HTML when the app loads CustomersModule. At the command line, enter the following:

ng generate component customers/customer-list

This creates a folder inside of customers called customer-list with the four files that make up the component.

Just like with the routing module, the CLI imports the CustomerListComponent into the CustomersModule.

Add another child module
For another place to route to, create a second child module with routing:

ng generate module orders --routing

This makes a new folder called orders containing an OrdersModule and an OrdersRoutingModule.
Now, just like with the CustomersModule, give it some content:

ng generate component orders/order-list

Set up the UI
Though you can type the URL into the address bar, a nav is easier for the user and more common. Replace the default placeholder markup in app.component.html with a custom nav so you can easily navigate to your modules in the browser:


src/app/app.component.html

<h1>
  {{title}}
</h1>
<button routerLink="/customers">Customers</button>
<button routerLink="/orders">Orders</button>
<button routerLink="">Home</button>
<router-outlet></router-outlet>
To see your app in the browser so far, enter the following command in the terminal window:

ng serve

Then go to localhost:4200 where you should see “app works!” and three buttons.

To make the buttons work, you need to configure the routing modules.

Configure the routes
The two child modules, OrdersModule and CustomersModule, have to be wired up to the AppRoutingModule so the router knows about them. The structure is as follows:


Each child module acts as a doorway via the router. In the AppRoutingModule, you configure the routes to the child modules, in this case OrdersModule and CustomersModule. This way, the router knows to go to the child module. The child module then connects the AppRoutingModule to the CustomersRoutingModule or the OrdersRoutingModule. Those routing modules tell the router where to go to load relevant components.

Routes at the app level
In AppRoutingModule, update the routes array with the following:


src/app/app-routing.module.ts
const routes: Routes = [
  {
    path: 'customers',
    loadChildren: () => import('app/customers/customers-routing.module')                                                     .then(m => m.CustomersModule),
  },
  {
    path: 'orders',
    loadChildren: () => import('app/orders/orders.module').then(m => m.OrdersModule),
  },
  {
    path: '',
    redirectTo: '',
    pathMatch: 'full'
  }];

 The import statements stay the same. The first two paths are the routes to the CustomersModule and the OrdersModule respectively. Notice that the lazy loading syntax uses loadChildren followed by a string that is the path to the module, a hash mark or #, and the module’s class name.

Inside the feature module
Next, take a look at customers.module.ts. If you’re using the CLI and following the steps outlined in this page, you don’t have to do anything here. The child module is like a connector between the AppRoutingModule and the child routing module. The AppRoutingModule imports the feature module, CustomersModule, and CustomersModule in turn imports the CustomersRoutingModule.


src/app/customers/customers.module.ts

import { NgModule } from '@angular/core';
import { CommonModule } from '@angular/common';
import { CustomersRoutingModule } from './customers-routing.module';
import { CustomerListComponent } from './customer-list/customer-list.component';

@NgModule({
  imports: [
    CommonModule,
    CustomersRoutingModule
  ],
  declarations: [CustomerListComponent]
})
export class CustomersModule { }
The customers.module.ts file imports the CustomersRoutingModule and CustomerListComponent so the CustomersModule class can have access to them. CustomersRoutingModule is then listed in the @NgModule imports array giving CustomersModule access to its own routing module, and CustomerListComponent is in the declarations array, which means CustomerListComponent belongs to the CustomersModule.

Configure the feature module’s routes
The next step is in customers-routing.module.ts. First, import the component at the top of the file with the other JavaScript import statements. Then, add the route to CustomerListComponent


src/app/customers/customers-routing.module.ts

import { NgModule } from '@angular/core';
import { Routes, RouterModule } from '@angular/router';
import { CustomerListComponent } from './customer-list/customer-list.component';
const routes: Routes = [
  {
    path: '',
    component: CustomerListComponent
  }
];

@NgModule({
  imports: [RouterModule.forChild(routes)],
  exports: [RouterModule]
})
export class CustomersRoutingModule { }

Notice that the path is set to an empty string. This is because the path in AppRoutingModule is already set to customers, so this route in the CustomersRoutingModule, is already within the customers context. Every route in this routing module is a child route.

Repeat this last step of importing the OrdersListComponent and configuring the Routes array for the orders-routing.module.ts:


src/app/orders/orders-routing.module.ts (excerpt)

import { OrderListComponent } from './order-list/order-list.component';

const routes: Routes = [
  {
    path: '',
    component: OrderListComponent
  }
];
Now, if you view the app in the browser, the three buttons take you to each module.

it’s working
Now you can test your app.

forRoot() and forChild()
You might have noticed that the CLI adds RouterModule.forRoot(routes) to the app-routing.module.ts imports array.
This lets Angular know that this module, AppRoutingModule, is a routing module and forRoot() specifies that this is the root routing module. It configures all the routes you pass to it, gives you access to the router directives, and registers the RouterService. Use forRoot() in the AppRoutingModule—that is, one time in the app at the root level.

The CLI also adds RouterModule.forChild(routes) to child routing modules. This way, Angular knows that the route list is only responsible for providing additional routes and is intended for child modules. You can use forChild() in multiple modules.

forRoot() contains injector configuration which is global; such as configuring the Router. forChild() has no injector configuration, only directives such as RouterOutlet and RouterLink.


Reference: https://angular.io/
Continue Reading →

Monday, 12 March 2018

How IIS Process ASP.NET Request

Introduction
When request come from client to the server a lot of operation is performed before sending response to the client. This is all about how IIS Process the request.  Here I am not going to describe the Page Life Cycle and there events, this article is all about the operation of IIS Level. 

What is Web Server ?
When we run our ASP.NET Web Application from visual studio IDE, VS Integrated ASP.NET Engine is responsible for executing all kind of asp.net requests and responses.  The process name is “WebDev.WebServer.Exe” which takes care of all request and response of a web application which is running from Visual Studio IDE.

Now, the name “Web Server” comes into picture when we want to host the application on a centralized location and wanted to access from many places. Web server is responsible for handle all the requests that are coming from clients, process them and provide the responses.

What is IIS ?
IIS (Internet Information Services) is one of the most powerful web servers from Microsoft that is used to host your ASP.NET Web application. IIS has its own ASP.NET Process Engine to handle the ASP.NET request. So, when a request comes from client to server, IIS takes that request and process it and send the response back to clients.

Request Processing :
Now let’s have a look how they do things internally. Before we move ahead, you have to know about two main concepts

1.    Worker Process
2.   Application Pool

Worker Process:  Worker Process (w3wp.exe) runs the ASP.Net application in IIS. This process is responsible for managing all the request and response that are coming from the client system.  All the ASP.Net functionality runs under the scope of the worker process.  When a request comes to the server from a client worker process is responsible for generating the request and response. In a single word, we can say worker process is the heart of ASP.NET Web Application which runs on IIS.

Application Pool: Application pool is the container of the worker process.  Application pools are used to separate sets of IIS worker processes that share the same configuration.  Application pools enable a better security, reliability, and availability for any web application.  The worker process serves as the process boundary that separates each application pool so that when one worker process or application is having an issue or recycles, other applications or worker processes are not affected. This makes sure that a particular web application doesn’t impact other web application as they are configured into different application pools.

Application Pool with multiple worker processes is called “Web Garden.”
Now let’s have a look how IIS process the request when a new request comes up from a client.
If we look into the IIS 6.0 Architecture, we can divide them into Two Layer

1.    Kernel Mode
2.    User Mode

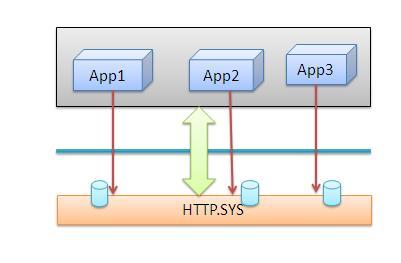
Now, Kernel mode is introduced with IIS 6.0, which contains the HTTP.SYS.  So whenever a request comes from Client to Server, it will hit HTTP.SYS First.
Now, HTTP.SYS is Responsible for pass the request to the particular Application pool. Now here is one question, How HTTP.SYS does come to know where to send the request?  This is not a random pickup. Whenever we create a new Application Pool, the ID of the Application Pool is being generated, and it’s registered with the HTTP.SYS. So whenever HTTP.SYS Received the request from any web application, it checked for the Application Pool and based on the application pool it sends the request.
So, this was the first steps of IIS Request Processing.
Till now, Client Requested for some information and request came to the Kernel level of IIS means at HTTP.SYS. HTTP.SYS has been identified the name of the application pool where to send. Now, let’s see how this request moves from HTTP.SYS to Application Pool.

In User Level of IIS, we have Web Admin Services (WAS) which takes the request from HTTP.SYS and pass it to the respective application pool.

When Application pool receives the request, it just passes the request to worker process (w3wp.exe). The worker process “w3wp.exe” looks up the URL of the request to load the correct ISAPI extension. ISAPI extensions are the IIS way to handle requests for different resources. Once ASP.NET is installed, it installs its own ISAPI extension (aspnet_isapi.dll) and adds the mapping into IIS.

When Worker process loads the aspnet_isapi.dll, it starts an HTTPRuntime, which is the entry point of an application. HTTPRuntime is a class which calls the ProcessRequest method to start Processing.

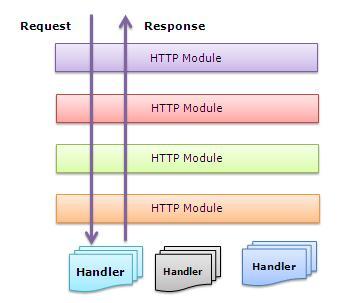
Now, the concept comes called “HTTPPipeline.” It is called a pipeline because it contains a set of HttpModules ( For Both Web.config and Machine.config level) that intercept the request on its way to the HttpHandler. HTTPModules are classes that have access to the incoming request. We can also create our HTTPModule if we need to handle anything during upcoming request and response.


HTTP Handlers are the endpoints in the HTTP pipeline. All request that is passing through the HTTPModule should reach to HTTPHandler.  The  HTTP Handler generates the output for the requested resource. So, when we were requesting for any aspx web pages,   it returns the corresponding HTML output.

All the request now passes from httpModule to respective HTTPHandler then the method and the ASP.NET Page life cycle starts.  This ends the IIS Request processing and starts the ASP.NET Page Lifecycle.
Conclusion
When the client request for some information from a web server, request first reaches to HTTP.SYS of IIS. HTTP.SYS then send the request to particular  Application Pool. Application Pool then forwards the request to worker process to load the ISAPI Extension which will create an HTTPRuntime Object to Process the request via HTTPModule and HTTP handler. After that, the ASP.NET Page LifeCycle events start.


Reference: Blog
Continue Reading →

Thursday, 8 March 2018

Angular 4 Compiler

Angular compilation

Angular offers two ways to compile your application:

Ahead-of-Time (AOT)-  which compiles your app at build time.
The Angular Ahead-of-Time (AOT) compiler converts your Angular HTML and TypeScript code into efficient JavaScript code during the build phase before the browser downloads and runs that code.

Just-in-Time (JIT)-  which compiles your app in the browser at runtime
JIT compilation is the default when you run the build-only or the build-and-serve-locally CLI commands:

ng build ng serve

For AOT compilation, append the --aot flags to the build-only or the build-and-serve-locally CLI commands:

ng build --aot ng serve --aot

The --prod meta-flag compiles with AOT by default.                                                          

Until Angular 8, the default compilation mode was JIT, but from angular 9, the default compilation is AOT. When we do ng serve, it depends on the value of aot passed in the angular.json file.

Continue Reading →

Tuesday, 6 March 2018

Web API 2- token based authentication

ASP.NET Web API can be accessed over Http by any client using the Http protocol. Typically, in a Line of Business (LOB) application, using Web API is a standard practice now-a-days. This framework enables data communication in JSON format (by default) and hence helps in lightweight communication.
  In token-based authentication (OWIN), you pass your credentials [user name and password], which go to authentication server. Server verifies your credentials and if it is a valid user then it will return a signed token to client system, which has expiration time. Client can store this token to locally using any mechanism like local storage, session storage etc. and if client makes any other call to server for data then it does not need to pass its credentials every time. Client can directly pass token to server, which will be validated by server and if token is valid then you will able to access your data.
How token based authentication actually works?
In the Token based approach, the client application first sends a request to Authentication server endpoint with an appropriate credential. Now If the username and password are found correct then the Authentication server send a token to the client as a response. This token contains enough data to identify a particular user and an expiry time.The client application then uses the token to access the restricted resources in next requests till the token is valid.

In this article, I have used Visual Studio 2015


1:- Create New Project.
Go to the file menu > create > projet > select "asp.net web application" under web > enter application name > select your project location > and then click on add button

    It will bring up a new dialog window for select template > here I will select empty template > and then checked MVC & Web API checkbox from Add folder and core references for > and then click on Ok button.

We are using OWIN [Open Web Interface for .Net] that is an interface between your web server and web application. So, it works as a middle ware in applications, which process your incoming request and validate it. Here we are using AuthServerProvider, which is nothing but a class which validate user based on their credentials. You can find this class below.

2: Add required references from NuGet packages into our application.
To Implement token based authentication in WEB API, we need to install followings references from NuGet packages
  • Microsoft.Owin.Host.SystemWeb
  • Microsoft.Owin.Security.OAuth
  • Microsoft.Owin.Cors
for adding following resources from NuGet, Go to Solution Explorer >  Right Click on References > Click on Manage NuGet packages > Search for the Microsoft.Owin.Host.SystemWeb, Microsoft.Owin.Security.OAuth & Microsoft.Owin.Cors and install.

3: Add a class for validating user credentials asking for tokens.

add a class in our application for validate the credentials for users and generate token.

In this class we will inherit "OAuthAuthorizationServerProvider" class for  overriding 2 methods "ValidateClientAuthentication" and "GrantResourceOwnerCredentials".

"ValidateClientAuthentication" method is used for validating client app (for the sake of simplicity, we will  deep dive on "ValidateClientAuthentication" method later) and in the "GrantResourceOwnerCredentials"  method we will validate the credentials of users and if we found valid credential, we will generate the signed token, using which user can access authorized resources of server.

AuthServerProvider.cs
using Microsoft.Owin.Security.OAuth;
using System;
using System.Collections.Generic;
using System.Linq;
using System.Security.Claims;
using System.Threading.Tasks;
using System.Web;

namespace WebApiTokenBasedAuth
{
    public class AuthServerProvider: OAuthAuthorizationServerProvider
    {
        public override async Task ValidateClientAuthentication(OAuthValidateClientAuthenticationContext context)
        {
            context.Validated(); 
        }

        public override async Task GrantResourceOwnerCredentials(OAuthGrantResourceOwnerCredentialsContext context)
        {
            var identity = new ClaimsIdentity(context.Options.AuthenticationType);
            if (context.UserName == "admin" && context.Password == "admin")
            {
                identity.AddClaim(new Claim(ClaimTypes.Role, "admin"));
                identity.AddClaim(new Claim("username", "admin"));
                identity.AddClaim(new Claim(ClaimTypes.Name, "Suraj Mad. Admin"));
                context.Validated(identity);
            }
            else if (context.UserName == "user" && context.Password == "user")
            {
                identity.AddClaim(new Claim(ClaimTypes.Role, "user"));
                identity.AddClaim(new Claim("username", "user"));
                identity.AddClaim(new Claim(ClaimTypes.Name, "Suraj Mad."));
                context.Validated(identity);
            }
            else
            {
                context.SetError("invalid_grant", "Provided username and password is incorrect");
                return;
            }
        }
    }
}

4: Add Owin Start Up class.

Now we will add OWIN Startup class. This is the startup class used to configure application startup.
It accepts IAppBuilder interface to manage middleware for the application. In this case it is OWIN. This function uses the OAuthAuthorizationServerOptions class which provides the information needed to control Authorization server middleware behavior. The code sets some properties for this class.
Go to Solution Explorer > Right Click on Project Name form Solution Explorer > Add > New Item > Select OWIN Startup class > Enter class name > Add.

Startup.cs
using System;
using Microsoft.Owin;
using Owin;
using Microsoft.Owin.Security.OAuth;
using System.Web.Http;

[assembly: OwinStartup(typeof(WebApiTokenBasedAuth.Startup))]
namespace WebApiTokenBasedAuth
{
    public class Startup
    {
        public void Configuration(IAppBuilder app)
        {
            //enable cors origin requests
            app.UseCors(Microsoft.Owin.Cors.CorsOptions.AllowAll);
            var myProvider = new WebApiTokenBasedAuth.AuthServerProvider();
            OAuthAuthorizationServerOptions options = new OAuthAuthorizationServerOptions
            {
                AllowInsecureHttp = true,
                TokenEndpointPath = new PathString("/token"),
                AccessTokenExpireTimeSpan = TimeSpan.FromDays(1),
                Provider = myProvider
            };
            app.UseOAuthAuthorizationServer(options);
            app.UseOAuthBearerAuthentication(new OAuthBearerAuthenticationOptions());

            HttpConfiguration config = new HttpConfiguration();
            WebApiConfig.Register(config);
        }
    }
}

In the above class we need the following important properties

· TokenEndPointPath - The client application communicates as part of the OAuth protocol. To complete the login with the token, /Token is used. The grant_type must be shared by the client to complete the login using access token generated by the server.

· AccessTokenExpirationTimeSpan - This is the time span for the life of the authorization token after being issued.

· Provider - The value for the property is set by the OAuthorizationServerProvider object. This class is responsible for providing behavior to requests. This is used to validate client authentication, claims etc.

AllowInsecureHttp - This is a Boolean property used to allow authorize and token requests to arrive on http URI address.

5: Add an another Class for override authorize attribute.

When building an HTTP REST API, we should use appropriate HTTP response codes to indicate the status of a response. I always use 401 and 403 status code for getting authentication/authorization status. 401 (Unauthorized) - indicates that the request has not been applied because it lacks valid authentication credentials for the target resource. and 403 (Forbidden) - when the user is authenticated but isn’t authorized to perform the requested operation on the given resource.

Unfortunately, the ASP.NET MVC/Web API [Authorize] attribute doesn’t behave that way – it always emits 401. So, here in our Web API application, I am going to add a class for override this behavior. Here we will return 403 when the user is authenticated but not authorized to perform the requested operation.

AuthorizeAttribute.cs
using System;
using System.Collections.Generic;
using System.Linq;
using System.Web;

namespace WebApiTokenBasedAuth
{
    public class AuthorizeAttribute: System.Web.Http.AuthorizeAttribute
    {
        protected override void HandleUnauthorizedRequest(System.Web.Http.Controllers.HttpActionContext actionContext)
        {
            if (!HttpContext.Current.User.Identity.IsAuthenticated)
            {
                base.HandleUnauthorizedRequest(actionContext);
            }
            else
            {
                actionContext.Response = new System.Net.Http.HttpResponseMessage(System.Net.HttpStatusCode.Forbidden);
            }
        }
    }
}

6: Add WEB API Controller. 
Add a WEB API Controller , Where we will add some action So we can check the token authentication is working fine or not.


7: Add an action for getting data from the server for all anonymous user.
I have added this action for all anonymous users. All type of request, whether it is authenticated or not can access this action.

        [AllowAnonymous]
        [HttpGet]
        [Route("api/MyWebApi/GetAll")]
        public IHttpActionResult Get()
        {
            return Ok("Now server time is: " + DateTime.Now.ToString());
        }

8: Add an another action for getting data from the server for all authenticated user.
I have added this action for all type of authenticated users, whether it is Admin user or normal user.

        [Authorize]
        [HttpGet]
        [Route("api/MyWebApi/authenticate")]
        public IHttpActionResult GetForAuthenticate()
        {
            var identity = (ClaimsIdentity)User.Identity;
            return Ok("Hello " + identity.Name);
        }

9: Add an another action for getting data from the server only for Admin user.
I have added this action only for Admin role type users.


        [Authorize(Roles = "admin")]
        [HttpGet]
        [Route("api/MyWebApi/authorize")]
        public IHttpActionResult GetForAdmin()
        {
            var identity = (ClaimsIdentity)User.Identity;
            var roles = identity.Claims
                        .Where(c => c.Type == ClaimTypes.Role)
                        .Select(c => c.Value);
            return Ok("Hello " + identity.Name + " Role: " + string.Join(",", roles.ToList()));
        }

10: Run Application.
Our WEB API Configuration is ready, Now we will test our application with POSTMAN

Postman is an extension of Chrome, which is used as a client application to test the request and response between web service and client.

Test 1:
Select GET (see below picture section 1),  Enter this url http://localhost:/api/MyWebApi/GetAll  and then click on send button.

We will get 200 OK status code (see section 3 in the below picture) and the result in the section 4 in that picture. That means our first action working fine when the request is anonymous.


But now if we try to access our 2nd action (GetForAuthenticate with url : http://localhost:52381/api/MyWebApi/authenticate) then we will get 401 Unauthenticated because the request is not authenticated yet. It will same for the 3rd action also.


So, what we need to access the 2nd and 3rd action? We need access token from server first and then we can access the 2nd and 3rd action with that access token.

Test 2 : Getting access token.
Select POST (in section 1),  Enter this URL http://localhost:/token (in section 2) and then click on body (in section 3) and select select x-www-form-urlencoded and then enter 3 parameter, 1. username (value : user) 2. password (value: user) and 3. grant_type (value: password) and then click on  send button. After click on send button we will get 200 OK (see section 4) and access token (see section 5)


Now we can access http://localhost:52381/api/MyWebApi/authenticate with that access token.

Test 3: Access restricted resource with access token.

Select GET(in section 1),  Enter this URL http://localhost:52381/api/MyWebApi/authenticate (in section 2) and then click on Headers(in section 3) and enter 1 parameter, Authorization (value : Bearer) and then click on  send button. After click on send button we will get 200 OK (see section 4) and the result (see section 5).

In the same way, we can access our 3rd action but we have to get token logged in with username : admin and password: admin because the 3rd action accessible only for Admin role user.

We have other machenish also for Authentication. click on below links for more.
  1. Basic Authentication https://www.freecodecamp.org/
  2. JWT Authentication https://www.c-sharpcorner.com/
Continue Reading →

Tuesday, 20 February 2018

Angular - Promises and Observables

Promise
Promises deal with one asynchronous event at a time.
In Angular we can use either Promises or Observables. By default the Angular Http service returns an Observable. To prove this, hover the mouse over the get() method of the Http service in any service.ts file. Notice from the intelligence, that it returns Observable[Response].
 To use Promises instead of Observables we will have to first make a change to the service to return a Promise instead of an Observable.

Observable
Observables can be defined as a streams of data whose items arrive asynchronously over time.
To use observables, Angular uses a third-party library called Reactive Extensions (RxJS). Observables are a proposed feature for ES 2016, the next version of JavaScript.

You can think of an observable as an array whose items arrive asynchronously over time. Observables help you manage asynchronous data, such as data coming from a backend service. Observables are used within Angular itself, including Angular’s event system and its http client service. To use observables, Angular uses a third-party library called Reactive Extensions (RxJS). 

Differences: 
In Angular, to work with asynchronous data we can use either Promises or Observable. There are several differences between Promises and Observables.
  • A Promise emits a single value where as an Observable emits multiple values over a period of time. You can think of an Observable like a stream which emits multiple items over a period of time and the same callback function is called for each item emitted. So with an Observable we can use the same API to handle asynchronous data whether that data is emitted as a single value or multiple values over a period of time.
  • A Promise is not lazy where as an Observable is Lazy. 
  • A Promise cannot be cancelled where as an Observable can be cancelled using the unsubscribe() method.
  • Observable provides operators like map, forEach, filter, reduce, retry, retryWhen etc.

Continue Reading →

Friday, 2 February 2018

IList and IEnumerable

In LINQ to query data from collections, we use IEnumerable and IList for data manipulation.IEnumerable is inherited by IList, hence it has all the features of it and except this, it has its own features. IList has below advantage over IEnumerable.

IList

  1. IList exists in System.Collections Namespace.
  2. IList is used to access an element in a specific position/index in a list.
  3. Like IEnumerable, IList is also best to query data from in-memory collections like List, Array etc.
  4. IList is useful when you want to Add or remove items from the list.
  5. IList can find out the no of elements in the collection without iterating the collection.
  6. IList supports deferred execution.
  7. IList doesn't support further filtering.

IEnumerable

  1. IEnumerable exists in System.Collections Namespace.
  2. IEnumerable is a forward only collection, it can't move backward and between the items.
  3. IEnumerable is best to query data from in-memory collections like List, Array etc.
  4. IEnumerable doen't support add or remove items from the list.
  5. Using Ienumerable we can find out the no of elements in the collection after iterating the collection.
  6. IEnumerable supports deferred execution.
  7. IEnumerable supports further filtering.
IEnumerable VS IEnumerator
Both of interfaces help to loop through the collection.

in the case of IEnumerator, we need to invoke the MoveNext method and to retrieve the current item, we need to invoke the current property.

Relation
The IEnumerable interface actually uses IEnumerator. The main reason to create an IEnumerable is to make the syntax shorter and simpler.

If you go to the definition of the IEnumerable<T> interface, you will see this interface has a method GetEnumerator() that returns an IEnumerator object back.

In short, this IEnumerable uses IEnumerator internally.

Differences
The main difference between IEnumerable and IEnumerator is an IEnumerator retains its cursor's current state.


IList and List

IList is an interface and List is concrete class. 
Let's suppose you have a business object where you want to use a object of type Apple. May be it is fine for now but later you may need to support Mango type object. In that case you may probably need to change the business layer. 
To get rid of these tight coupling you need to use interface like IFruit. Then your business layer will not depend just on Apple class and you will get rid of tight coupling. 

Continue Reading →

Topics

ADFS (1) ADO .Net (1) Ajax (1) Angular (47) Angular Js (15) ASP .Net (14) Authentication (4) Azure (3) Breeze.js (1) C# (55) CD (1) CI (2) CloudComputing (2) Coding (10) CQRS (1) CSS (2) Design_Pattern (7) DevOps (4) DI (3) Dotnet (10) DotnetCore (20) Entity Framework (5) ExpressJS (4) Html (4) IIS (1) Javascript (17) Jquery (8) jwtToken (4) Lamda (3) Linq (10) microservice (4) Mongodb (1) MVC (46) NodeJS (8) React (10) SDLC (1) Sql Server (32) SSIS (3) SSO (1) TypeScript (3) UI (1) UnitTest (2) WCF (14) Web Api (16) Web Service (1) XMl (1)

Dotnet Guru Archives